Lesson Messaging For Educators
Educators can enhance learning with Follett eBooks by creating notes that ask critical-thinking questions, integrate writing activities and supplement content. By sharing these with one or more students, the teacher and student can carry on a conversation within their Notebooks.
Important: You must be connected to the Internet and logged into Destiny Discover™ to access your Notebook.
To send and receive Lesson Messages:
- Do one of the following to open your Notebook:
- From an open eBook, click Notebook.
- From any page in Destiny Discover, select
 > Notebook. > Notebook.
- Depending on how you opened your Notebook, review your notes and highlights:
- If you opened the Notebook from an open eBook, the notes for that title appear. You can access all of your notes by clicking Titles, and then All.
- If you opened the Notebook from any page in Destiny Discover, the notes for all titles appear. To review notes for a specific title, click
 to the left of the title. The section expands, and the arrow points down. to the left of the title. The section expands, and the arrow points down.
- To the right of the title you want to share notes for, select Sharing.
- Use the following table to choose what you want to do:
| If you want to…
| Then… |
|---|
| Share with a group you already created | Next to the group name, click Start Sharing.
| | Share with a new group | - Click Manage Groups.
- From the drop-down, select Create New Group.
Note: You can add or remove students from a group from the Manage Groups page. Select the group from the drop-down, and click Edit.
- In the Group Name field, type a name, and then click Assign Patrons.
- Search for a student by typing a name in the search field, or narrow your results using the filters.
Note: You can only assign students who have previously logged in to Destiny Discover to a group.
- To assign students to the group, click Assign. To remove any students, click Unassign.
- Use the back arrow to view all the groups.
- Next to the group name you just created or edited, click Start Sharing.
|
- From the Manage Sharing page, select the Tag Options you want the group to see.
Note: Tag options include all of your tags and highlight colors. All highlights and highlight notes have at least one tag, the description of the highlight color.
- For more sharing options, click Show Advanced Options. Use the following table to select the appropriate checkboxes:
| Checkbox |
Definition |
|
| Highlights/Highlight Notes |
Deselect this checkbox if you do not want to share highlights/highlight notes. |
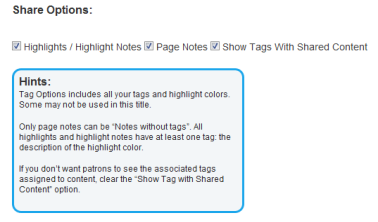
|
| Page Notes |
Deselect this checkbox if you do not want to share page notes. |
| Show Tags With Shared Content |
Deselect this checkbox if you do not want groups to see the associated tags assigned to highlights, highlight notes or page notes. |
- Click Save.
To view and reply to messages from students:
- Do one of the following to open your Notebook:
- From an open eBook, click Notebook.
- From any page in Destiny Discover, select > Notebook.
- To see a comment from a student, click
 to the left of Conversations for a note or highlight. to the left of Conversations for a note or highlight.
- To view a student’s reply, click
 next to his or her name. next to his or her name.
- To reply to the student’s message, click Comment.
- In the text box that appears, type your message.
- To send your reply to the student, click Save. Your reply appears below the student’s message.
|